Tuesday, December 23, 2008

Crochet Plastic Bag

This project takes a very long time to make. (too many hours to count) The main downside about this project is that you need a crochet hook. But the good part is that you can buy one from your local craft store.

I have not tested the amount of weight this bag can carry, but I'm fairly certain it is a very sturdy bag. Make sure you don't put any hook-like materials in the bag because it might catch on a loop. Also, sharp objects can cut the plastic, so try and think before you put various items in the bag.

Materials:
-Lots of plastic bags you get from places like grocery stores (I used about 16)
-Scissors
-Crochet hook (I used a size K)
Process:
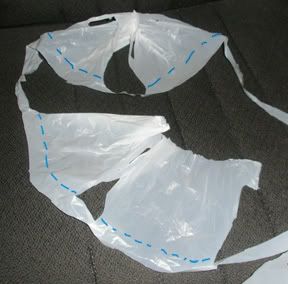
In order to prepare the plastic bags, you have to cut it into 1.5 inch strips. Cut in a spiral to make it into one long strip. Cut off the handles since they are in the way.

As said before, I used about 16 to make my bag, but you can always cut more later.

Now, you take the strips and crochet them into a bag. First of all, here's the pattern. It makes a bag with about a 7.5 inch base (diameter) and about a 9 inch height. (if your stitches are a little larger than 1 inch each)

1: Make 4 chains
2: Make 10 double crochets in the first chain (you may want to use a colored piece of yarn or twist tie to keep track on where the row starts)
3: Make increases until the row is completed (if you want your bag's base to be smaller, then omit this row and continue to the next one)
4: Make 2 increase stitches, then a double crochet and repeat this until the row is completed
5: Make an increase stitch, then a double crochet and repeat until the row is completed
6-14: Make double crochet stitches until 9 rows are completed (you can add or decrease more rows to control how tall you want your bag to be)
At the end: Make a single crochet, make a slotted stitch, then end the piece

Here are some videos I made that explains parts in more detail than I can type out:
-Beginning the bag (Includes how to make a chain, double crochet, & increase)
-Ending the Bag (Includes how to single crochet, slotted stitch, & end)


To make the handles of the bag, there are many styles you can do. There is the one long strap you can have and put over your shoulder like a messenger bag or two shorter ones you can use like the grocery bags. It's all up to you, but here's the pattern to make the strap:

1: Make three double crochets on the bag as if you were continuing to build up on the bag's sides (if you want your bag's strap fatter or skinnier, then you can add or subtract the amount of stitches)
2: Turn your work around. Make 3 chains, then make 2 double crochets
Repeat the above row until your strap is as long as you want it
At the end: Make 3 slotted stitches to join the strap to the bag (where ever you want it)

Here are some videos I made that explains parts in more detail than I can type out:
-Making the strap (Includes how to make a chain, double crochet, and slotted stitch)

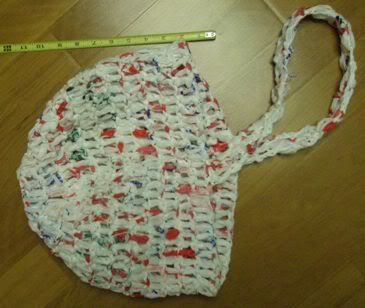
This is the final product:

Wednesday, December 10, 2008

First Paper Bead Workshop

I went to the Luke Center and waited for Luke Leaders to come, so I could teach them how to make paper beads. The Luke Leaders have many tasks to do like calling clients, so the first two people who arrived didn't have time. But luckily since the list dwindled down, the next group of three people sat down and helped me make the beads.

It was really fun to talk to them while making the paper beads and the designs they thought of were very interesting and unique.

I want to make another workshop time, but maybe on a different day since I want to teach more people. I hope the Luke Leaders will continue to make paper beads for the Sustainibility Fair because I think it will be a good idea because you can make a lot of them, so many people will buy them and have a token to remember to reuse, reduce, and recycle. (trash to treasure items usually sell out fast, so having many products will make sure more people who want one will have one)

I feel as though, however, that I need to take a bit more responsibility in this idea for the Sustainibility Fair in order to make sure the idea gets through and finishes.

Sunday, December 7, 2008

Paper Beads

These beads not only show you are dedicated to recycle, but if given as a gift it can remind others to reuse, reduce, and recycle.

Materials:
-A paper material (could be anything from regular paper to magazines to paper bags to gift wrap!)
- White glue
- Gluestick
- Water
- Small paint brush
- Toothpicks
- Ruler
- Pencil for marking
- Paper cutter or scissors
- Optional: Pens for decorating

Process:
These beads are quite simple once you get the hang of it. First off is the prepping!
Get your piece of paper material. As mentioned above, it could be any type of paper! You're only limited to what you can think of. Apparently brown paper bags make beads that look kind of like wood and magazine pages as well as wrapping paper are pre-decorated, too. If you don't have these things, then you can use printer paper you printed on but don't need. In order to get pre-colored printer paper and you don't have any, ask around. Teachers or copying centers (at schools or your business) may have some sheets they used but don't need.
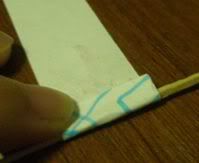
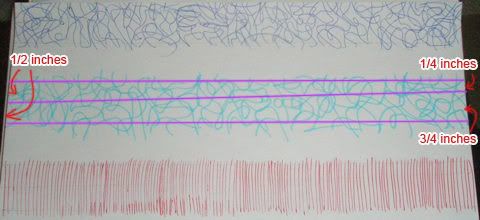
Now, draw lines the long way of the paper to use as guides when you cut the paper. One strip should be 3/4 inches wide then taper to 1/2 of an inch. The second strip should be from 1/2 of an inch wide to 1/4 of an inch wide. (see the picture for a better explination) If you want to decorate your bead, use a pen and scribble on it, make stripes, or do what ever you want! I used a ball point pen, a highlighter, and the bottom is a gel pen.

Now cut the paper and get the 3/4 inch to 1/2 inch strip. On the 3/4 side, fold it a bit over a toothpick (see picture) and secure it with glue from your gluestick. This will be the start of your bead. Make sure the print is on the outside! Now apply more glue from the gluestick and roll the paper. Try and keep the paper in the middle, so your bead isn't lopsided (unless you want it to be).

After you're done with that strip of paper, move on to the 1/2-1/4 strip. Get the 1/2 inch end and overlap it with the strip you just used up on the bead and continue to roll.
Once you're done, it's time to glaze the bead. There are different materials you can use to glaze the bead, but I decided to use white glue because it isn't too toxic. Put the glue in a cup/container you don't mind never drinking or eating out of again. Mix about three parts glue to one part water. When in doubt, don't less water is better. Now, take the paint brush and apply the glue mixture on the bead. If you don't have a brush, you can buy a really cheap one and it won't matter. If you had watercolor sets when you were a kid, they have brushes in them you can use for this project, too. That's what I did. Don't put on too much glue because when it dries it'll drip and not dry in an even coating. Just coat the bead until the whole surface is covered.
Dry the bead in a rack. I made mine out of a sheet of regular paper. Just fold the paper once the long way. Then fold it into thirds and take the outer thirds and fold a small flap for the toothpicks to rest themselves on (see pictures). The gel pen ink kind of ran but not too much.

After they dry, you can add more glue coats, but I don't think this is necessary. Remember, the glue glaze isn't water proof since white glue is water based. Don't get them too wet! If you want to glaze them with something better, then apply clear nail polish and let them dry again.

Now that you know the basics, you can play with the size of the strips and make beads of various sizes and shapes. Experiment with different materials, too! (if you want to make a cylindrical bead, just make the width of the strips constant)