Materials:
-A paper material (could be anything from regular paper to magazines to paper bags to gift wrap!)
- White glue
- Gluestick
- Water
- Small paint brush
- Toothpicks
- Ruler
- Pencil for marking
- Paper cutter or scissors
- Optional: Pens for decorating
Process:
These beads are quite simple once you get the hang of it. First off is the prepping!
Get your piece of paper material. As mentioned above, it could be any type of paper! You're only limited to what you can think of. Apparently brown paper bags make beads that look kind of like wood and magazine pages as well as wrapping paper are pre-decorated, too. If you don't have these things, then you can use printer paper you printed on but don't need. In order to get pre-colored printer paper and you don't have any, ask around. Teachers or copying centers (at schools or your business) may have some sheets they used but don't need.
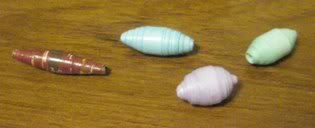
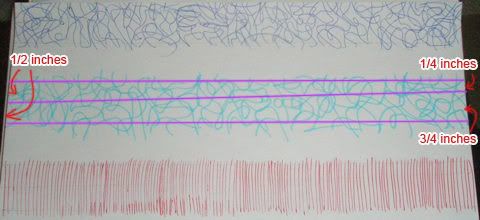 Now, draw lines the long way of the paper to use as guides when you cut the paper. One strip should be 3/4 inches wide then taper to 1/2 of an inch. The second strip should be from 1/2 of an inch wide to 1/4 of an inch wide. (see the picture for a better explination) If you want to decorate your bead, use a pen and scribble on it, make stripes, or do what ever you want! I used a ball point pen, a highlighter, and the bottom is a gel pen.
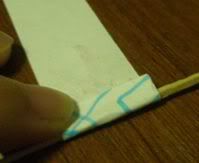 Now cut the paper and get the 3/4 inch to 1/2 inch strip. On the 3/4 side, fold it a bit over a toothpick (see picture) and secure it with glue from your gluestick. This will be the start of your bead. Make sure the print is on the outside! Now apply more glue from the gluestick and roll the paper. Try and keep the paper in the middle, so your bead isn't lopsided (unless you want it to be).
 After you're done with that strip of paper, move on to the 1/2-1/4 strip. Get the 1/2 inch end and overlap it with the strip you just used up on the bead and continue to roll.
Once you're done, it's time to glaze the bead. There are different materials you can use to glaze the bead, but I decided to use white glue because it isn't too toxic. Put the glue in a cup/container you don't mind never drinking or eating out of again. Mix about three parts glue to one part water. When in doubt, don't less water is better. Now, take the paint brush and apply the glue mixture on the bead. If you don't have a brush, you can buy a really cheap one and it won't matter. If you had watercolor sets when you were a kid, they have brushes in them you can use for this project, too. That's what I did. Don't put on too much glue because when it dries it'll drip and not dry in an even coating. Just coat the bead until the whole surface is covered.
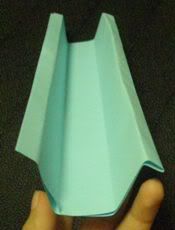
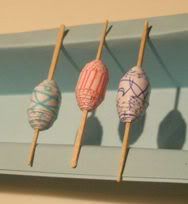 Dry the bead in a rack. I made mine out of a sheet of regular paper. Just fold the paper once the long way. Then fold it into thirds and take the outer thirds and fold a small flap for the toothpicks to rest themselves on (see pictures). The gel pen ink kind of ran but not too much.
After they dry, you can add more glue coats, but I don't think this is necessary. Remember, the glue glaze isn't water proof since white glue is water based. Don't get them too wet! If you want to glaze them with something better, then apply clear nail polish and let them dry again.
Now that you know the basics, you can play with the size of the strips and make beads of various sizes and shapes. Experiment with different materials, too! (if you want to make a cylindrical bead, just make the width of the strips constant)
No comments:
Post a Comment